


This series is designed to help people to understand modern technology, and become more confident in using computing devices. It is not designed to educate experts.
The author is involved in tutoring older students at SeniorNet, a New Zealand wide organisation. SeniorNet hopes that students will feel more confident in using their computing devices as a result of the learning opportunities offered. This series of articles shares that hope.
I hope the unusual heading grabbed your attention. Today I’m talking about a dry subject, but one that can speed up the loading of websites, and improve your privacy score.
It’s DNS. DNS Definition. The domain name system (DNS) connects URLs (web addresses) with their IP address(computer readable address). So it’s the telephone directory for the internet.
Nearly everything on the Internet starts with a DNS request. DNS is the Internet’s directory. Click on a link, open an app, send an email and the first thing your device does is ask the directory: Where can I find this? Unfortunately, by default, DNS is usually slow and insecure. Your ISP (internet service provider such as Spark, Vodafone etc), and anyone else listening in on the Internet, can see every site you visit and every app you use — even if their content is encrypted. Creepily, some DNS providers sell data about your Internet activity or use it to target you with ads.
We can control the DNS system either at your device (computer, tablet, smart phone or smart TV) or at the Wi-Fi router. I will talk about the second of these as it controls all your devices with one setting.
Your ISP (Internet Service Provider, such as Spark, Vodafone or 2 Degrees) normally provides your DNS setting as part of the set up of your router. But this DNS can be slow and problematic as stated above.
What to do? What to do?
There are services called free and public DNS servers that provide a service to answer these problems. And of course we want the fastest and most secure.
Best free and public DNS servers in 2020.
And my pick of these is……..
1.1.1.1 – By Cloudflare. Here’s a youtube video on this.

If you decide to use Google’s service you are just handing them more data to use in slinging adverts at you.
So, how does one go about changing your Wi-Fi router to use the service.
Important disclaimer: The following procedure works for me. Each Wi-Fi router is different, and I can take no responsibility if yours is different, and the procedures don’t work, or have unintended consequences. Make a careful note of the existing settings so you can return the router to its previous state should you experience difficulties.
Available Settings:
There are three different settings available from Cloudflare in addition to 1.1.1.1. Visit their website for more detailed information.
Standard:
1.1.1.1 and 1.0.0.1 This is the normal bare DNS setting.
Families:
There are two settings available here.
Malware Blocking Only : Use 1.1.1.2 and 1.0.0.2 (Handy for Windows users).
Malware and Adult Content Blocking Together : Use 1.1.1.3 and 1.0.0.3 (Handy if you’ve got young people using your internet, and you want to have some control of adult content. I’ve tested it, and it does work).
The following examples are from my Vodafone Home Gateway HG659 Wi-Fi router. Here is a YouTube video detailing the following steps.
Step one is to find the IP address assigned to your router. Here’s how.
Here is my Linux information, and the address is 192.168.1.1. For most people it will be either as shown or 192.168.0.1.

To locate the default username and password for the router, look in its manual. If you’ve lost the manual, you can often find it by searching for your router’s model number and “manual” on Google. Or just search for your router’s model and “default password.”
The next step is to log into your router. From your computer or laptop (I use my laptop via Wi-Fi) enter the IP address you found from the previous step into your browser, and press Enter. Then enter the default username and password, or if you’ve previously changed these enter the new credentials.
If you’ve changed the login and forgotten it, reset your router:
- Locate the Reset button on the back of your router.
- With the router powered on, use the pointed end of a paperclip or similar object to press and hold the Reset button for 15 seconds.
- Wait for the router to fully reset and power back on.
The default username and password should now work.

You now need to locate the internet section of your Wi-Fi router. Here’s what mine looks like.
Select Internet Settings and scroll down until you see the information concerning Internet Ethernet.


Important: Record these settings before you proceed. I use a Linux screen capture utility for this purpose, and save the resulting file to my computer.
Click the Edit button,scroll down and select Static DNS. This revealed my current DNS settings as supplied by my Internet Service Provider, Vodafone.
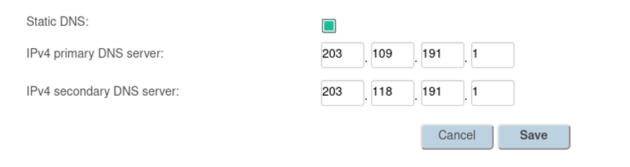
Important: Once again, record these existing settings.
Now change the settings to your new DNS provider. I use 1.1.1.1 and 1.0.0.1. See the three settings available from Cloudflare further up this article. For IPv6 (which I don’t use because it doesn’t work with my VPN) the setting is 2606:4700:4700::1111,2606:4700:4700::1001
Click save, and wait for your Wi-Fi router to reset. Restart your browser and you should have improved the speed (and safety) of your internet.
If you don’t like the new settings, log on and change the settings back to the original settings (you did record them as instructed, didn’t you?)
If you enjoyed this BFD article please share it.